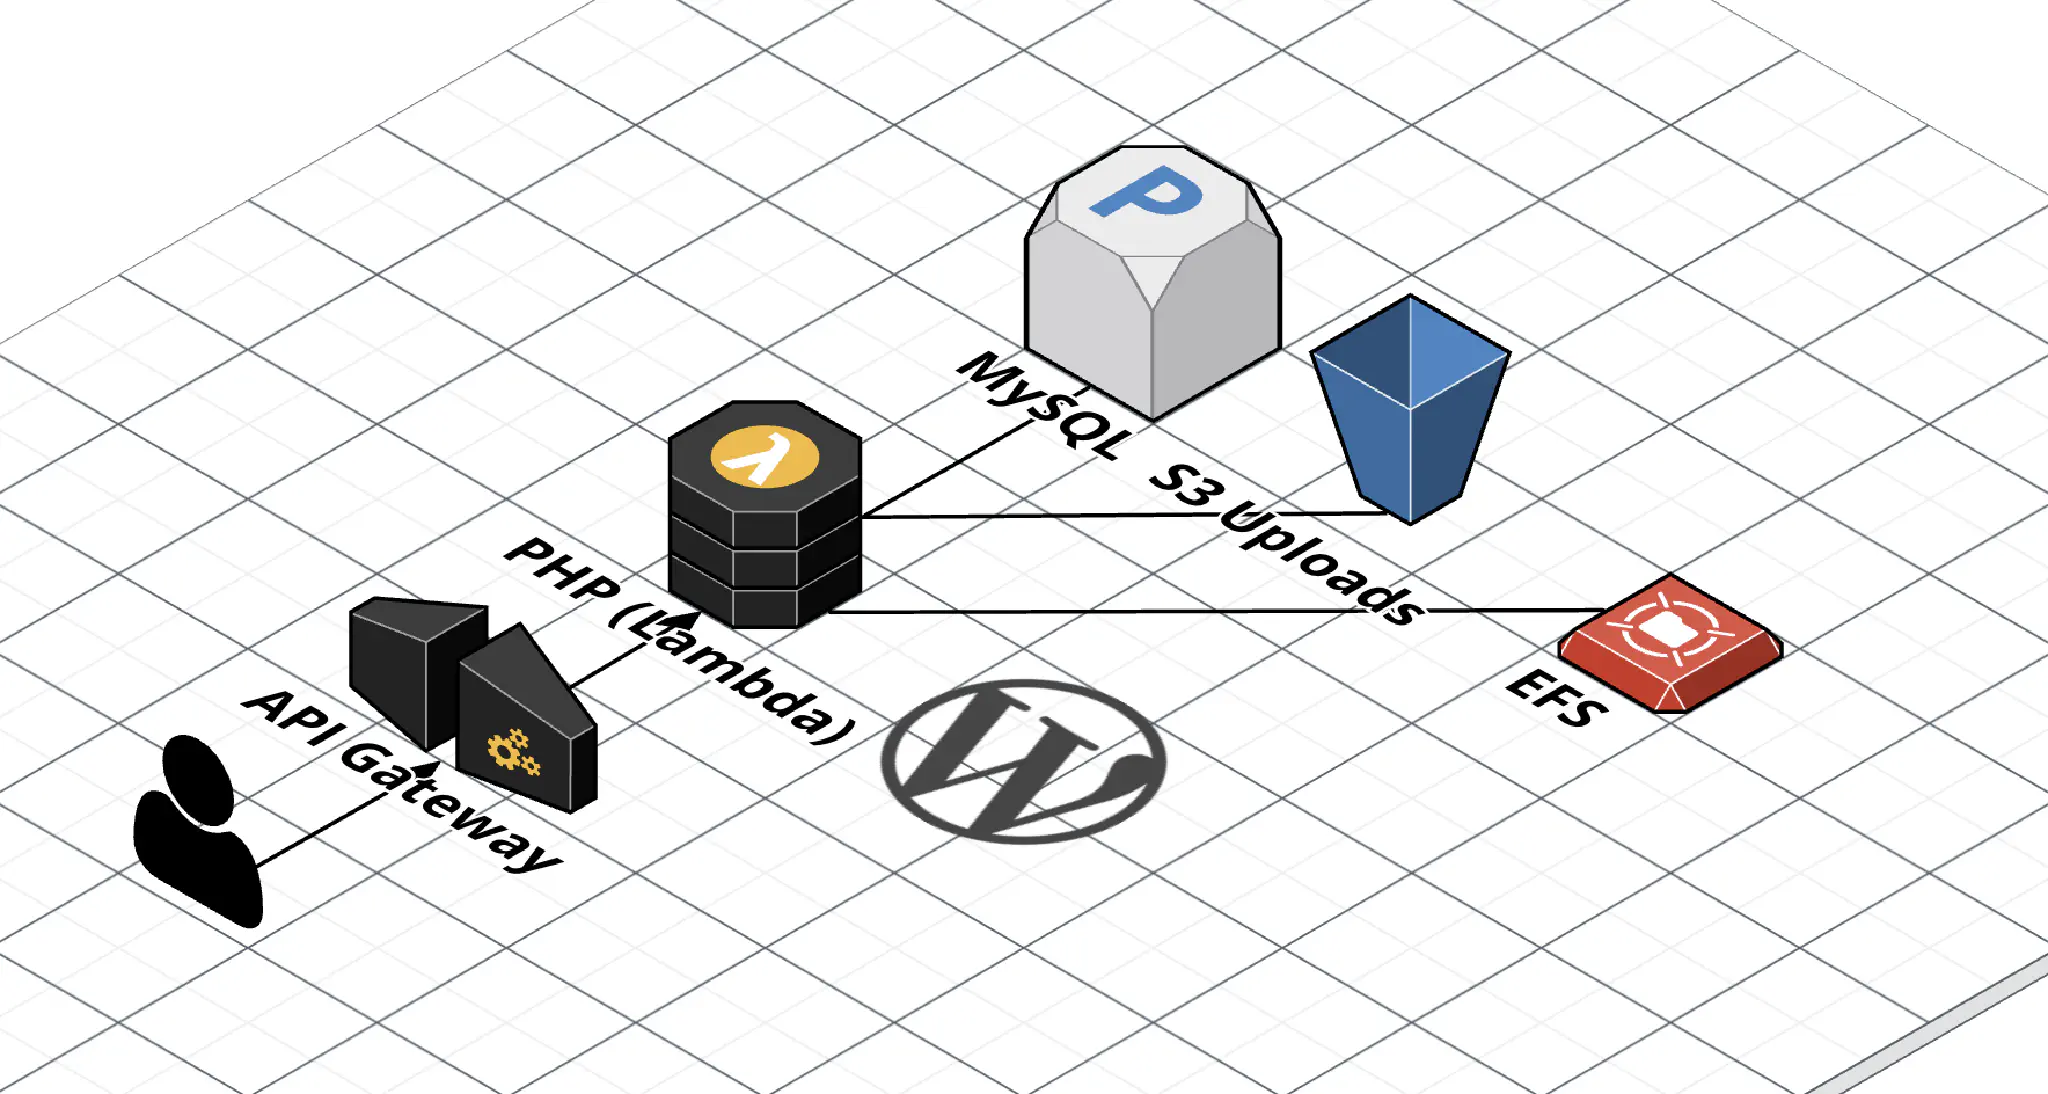
WordPress on AWS Lambda (EFS Edition)
I previously wrote a post about running WordPress on AWS Lambda, but it was before EFS support was announced (EFS is a managed network file system AWS provides). Being able to use EFS completely changes the way WordPress works in Lambda (for the better!), so I felt it warranted a new blog post.
In addition, this time I’m using Terraform instead of SAM. This matches the existing infrastructure-as-code setup I use when I deploy infrastructure for clients. Here’s the Terraform module ( source code).
Summary
It works. It’s OK. Check it out, it’s running here. It’s not the best, but it isn’t bad, either. The biggest performance bottleneck is the EFS filesystem, and there’s no getting around that. PHP is serving static assets bundled with WordPress as well, which adds to some latency (in this configuration, CloudFront is caching most of these files, however). Tuning opcache to cache files in memory longer helped a lot.
Because EFS is synchronized across all the instances of Lambda, online updates, installs, and uploads work as expected.
What You’ll Need
In this setup, Lambda is only used for running PHP – installing the initial WordPress files is done on an EC2 instance that has the EFS volume mounted. This is a list of what you’ll need.
- An AWS account.
- A VPC with Internet access through a NAT gateway or instance ( comparison). This is important because EFS connectivity requires Lambda to be set up in a VPC, but it won’t have Internet access by default.
- Terraform (the module uses v0.12 syntax, so you’ll need to use v0.12.)
- A MySQL database (I’m using MySQL on RDS using the smallest instance available)
- An EC2 instance to perform the initial setup and install of WordPress.
For a list of the resources that Terraform will provision, take a look at the Resources page here.
Steps
These steps assume you’re running this Terraform module standalone – if you want to run it in the context of an existing Terraform setup, prepare to adjust accordingly.
If you’re following this step-by-step, be sure to choose the us-west-2 region. Lambda Layer that I’m using for this is only published in the us-west-2 region. I’m working on getting the layer published in other regions, but in the meantime, use my fork of the php-lambda-layer to create your own in the region of your choosing.
1. Start the EC2 instance.
(If it isn’t already running)
I’m using a t3a.nano instance. Install the amazon-efs-utils package to get ready for mounting the EFS volume.
Also, while you’re in the console, note down the ID of a Security Group that allows access to RDS and the IDs of the private subnets to launch Lambda in.
2. Get Terraform up and running.
$ git clone https://github.com/KotobaMedia/terraform-aws-wordpress-on-lambda-efs
$ cd ./terraform-aws-wordpress-on-lambda-efs
Create a file called local.auto.tfvars, and put the following contents in to it:
# An array of the Security Group IDs you listed in step 1.
security_group_ids = ["sg-XXX"]

# An array of the Subnet IDs you listed in step 1.
subnet_ids = ["subnet-XXX", "subnet-XXX", "subnet-XXX"]
If you want to use a custom domain name (instead of the default randomly-generated CloudFront domain name), set the acm_certificate_arn and domain_name variables as well.
Now, you’re ready to create the resources.
$ terraform apply
If you’re asked for your AWS credentials, Ctrl-C and try setting the authentication information via environment variables. I manage a lot of AWS accounts, so I use the AWS_PROFILE environment variable.
Terraform will ask you if you want to go ahead with the apply or not – look over the changes (the initial apply should not have any modifications or deletions), then respond yes.
When the apply has finished, you should see some outputs. If you don’t (or you already closed the window), you can always run terraform output. Keep this window open, you’ll need it in the next step.
3. Mount EFS on the EC2 instance.
First, we need to give the EC2 instance access to the EFS filesystem. Terraform created a security group for us (it’s in the efs_security_group_id output), so attach that to your EC2 instance.
Log in to your EC2 server, then mount the EFS filesystem (replace fs-XXXXX with the value of the efs_file_system_id output):
$ sudo -s
# mkdir /mnt/efs
# mount -t efs fs-XXXXX:/ /mnt/efs
If you’re having trouble mounting the filesystem, double check the security groups and take a look at the User Guide.
4. Install WordPress.
Now that the filesystem is mounted, we can finally proceed to install WordPress. Terraform automatically created a directory in the EFS filesystem ( /mnt/efs/roots/wp-lambda-$RANDOM_STRING), so cd to there first. Download the latest version of WordPress, then extract the files there.
Now, you can go ahead with the famous five-minute install like you would with any other WordPress site! If you didn’t set a custom domain name, your site should be accessible at the domain name outputted at cloudfront_distribution_domain_name. If you did set a custom domain, then set a CNAME or alias to the CloudFront distribution domain name, then you should be able to access the site there.
Where to go from here
Here are some ideas for performance improvements that I haven’t tried, but should have some potential.
- Upload files to S3 instead of WordPress. I use this plugin by Human Made: humanmade/S3-Uploads.
- Experiment with adjusting the opcache settings in
src/php.ini. - Use a lightweight nginx server to serve static assets from EFS to CloudFront.
- Experiment with setting
Cache-Controlheaders inhandler.phpfor static files.
Limitations
There are a couple hard limits imposed by AWS due to the technical limitations of the infrastructure.
- The Invocation Payload limit for AWS Lambda is 6 MB. This means that you can’t send files larger than 6MB to WordPress hosted on Lambda.
- The integration timeout for API Gateway is 29,000ms. Requests that are longer than 29 seconds will be terminated – I encountered this sometimes during updates and plugin installs.
Here are some other limitations that you’ll have to keep in mind.
- No FTP / SSH access – you’ll need to manage an EC2 instance if you need command line or direct file access.
- All the considerations of accessing a connection-oriented database from Lambda. You can try using Aurora Serverless if you run in to connection problems. RDS Proxy may also be able to provide you with a solution.
Thanks!
Thanks for reading! If you have any questions or comments, please don’t hesitate to leave a comment or send me a tweet.