Categories
AWS English

My Brief Thoughts on the AWS Kinesis Outage

There have been multiple analyses about the recent (2020/11/25) outage of AWS Kinesis and its cascading failure mode, taking a chunk of AWS services with it — including seemingly unrelated Cognito — due to dependencies hidden to the user. If you haven’t read the official postmortem statement by AWS yet, go read it now.

There are an infinite amount of arguments that can made about cascading failure; I’m not here to talk about that today. I’m here to talk about a time a few years ago I was evaluating a few systems to do event logging. Naturally, Kinesis was in consideration, and our team interviewed an AWS Solution Architect about potential design patterns we could implement, what problems they would solve, what hiccups we may encounter on the way, et cetera.

At the time, I didn’t think much of it, but in hindsight it should have been a red flag.

ME: “So, what happens when Kinesis goes down? What kind of recovery processes do you think we need to have in place?”

SA: “Don’t worry about that, Kinesis doesn’t go down.”

The reason I didn’t think much of it at that time was that our workload would have been relatively trivial for Kinesis, and I mentally translated the reply to “don’t worry about Kinesis going down for this particular use case”.

We decided to not go with Kinesis for other reasons (I believe we went with Fluentd).

Maybe my mental translation was correct? Maybe this SA had this image of Kinesis as a system that was impervious to fault? Maybe it was representative of larger problem inside AWS of people who overestimated the reliability of Kinesis? I don’t know. This is just a single data point — it’s not even that strong. A vague memory from “a few years ago”? I’d immediately dismiss it if I heard it.

The point of this post is not to disparage this SA, nor to disparage the Kinesis system as a whole (it is extremely reliable!), but to serve as a reminder (mostly to myself) that one should be immediately suspicious when someone says “never” or “always”.

Categories
AWS English WordPress

WordPress on AWS Lambda (EFS Edition)

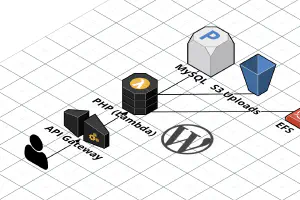
I previously wrote a post about running WordPress on AWS Lambda, but it was before EFS support was announced (EFS is a managed network file system AWS provides). Being able to use EFS completely changes the way WordPress works in Lambda (for the better!), so I felt it warranted a new blog post.

In addition, this time I’m using Terraform instead of SAM. This matches the existing infrastructure-as-code setup I use when I deploy infrastructure for clients. Here’s the Terraform module (source code).

Summary

It works. It’s OK. Check it out, it’s running here. It’s not the best, but it isn’t bad, either. The biggest performance bottleneck is the EFS filesystem, and there’s no getting around that. PHP is serving static assets bundled with WordPress as well, which adds to some latency (in this configuration, CloudFront is caching most of these files, however). Tuning opcache to cache files in memory longer helped a lot.

Because EFS is synchronized across all the instances of Lambda, online updates, installs, and uploads work as expected.

What You’ll Need

In this setup, Lambda is only used for running PHP — installing the initial WordPress files is done on an EC2 instance that has the EFS volume mounted. This is a list of what you’ll need.

  1. An AWS account.
  2. A VPC with Internet access through a NAT gateway or instance (comparison). This is important because EFS connectivity requires Lambda to be set up in a VPC, but it won’t have Internet access by default.
  3. Terraform (the module uses v0.12 syntax, so you’ll need to use v0.12.)
  4. A MySQL database (I’m using MySQL on RDS using the smallest instance available)
  5. An EC2 instance to perform the initial setup and install of WordPress.

For a list of the resources that Terraform will provision, take a look at the Resources page here.

Steps

These steps assume you’re running this Terraform module standalone — if you want to run it in the context of an existing Terraform setup, prepare to adjust accordingly.

If you’re following this step-by-step, be sure to choose the us-west-2 region. Lambda Layer that I’m using for this is only published in the us-west-2 region. I’m working on getting the layer published in other regions, but in the meantime, use my fork of the php-lambda-layer to create your own in the region of your choosing.

1. Start the EC2 instance.

(If it isn’t already running)

I’m using a t3a.nano instance. Install the amazon-efs-utils package to get ready for mounting the EFS volume.

Also, while you’re in the console, note down the ID of a Security Group that allows access to RDS and the IDs of the private subnets to launch Lambda in.

2. Get Terraform up and running.
$ git clone https://github.com/KotobaMedia/terraform-aws-wordpress-on-lambda-efs
$ cd ./terraform-aws-wordpress-on-lambda-efs

Create a file called local.auto.tfvars, and put the following contents in to it:

# An array of the Security Group IDs you listed in step 1.
security_group_ids = ["sg-XXX"]

# An array of the Subnet IDs you listed in step 1.
subnet_ids = ["subnet-XXX", "subnet-XXX", "subnet-XXX"]

If you want to use a custom domain name (instead of the default randomly-generated CloudFront domain name), set the acm_certificate_arn and domain_name variables as well.

Now, you’re ready to create the resources.

$ terraform apply

If you’re asked for your AWS credentials, Ctrl-C and try setting the authentication information via environment variables. I manage a lot of AWS accounts, so I use the AWS_PROFILE environment variable.

Terraform will ask you if you want to go ahead with the apply or not — look over the changes (the initial apply should not have any modifications or deletions), then respond yes.

When the apply has finished, you should see some outputs. If you don’t (or you already closed the window), you can always run terraform output. Keep this window open, you’ll need it in the next step.

3. Mount EFS on the EC2 instance.

First, we need to give the EC2 instance access to the EFS filesystem. Terraform created a security group for us (it’s in the efs_security_group_id output), so attach that to your EC2 instance.

Log in to your EC2 server, then mount the EFS filesystem (replace fs-XXXXX with the value of the efs_file_system_id output):

$ sudo -s
# mkdir /mnt/efs
# mount -t efs fs-XXXXX:/ /mnt/efs

If you’re having trouble mounting the filesystem, double check the security groups and take a look at the User Guide.

4. Install WordPress.

Now that the filesystem is mounted, we can finally proceed to install WordPress. Terraform automatically created a directory in the EFS filesystem (/mnt/efs/roots/wp-lambda-$RANDOM_STRING), so cd to there first. Download the latest version of WordPress, then extract the files there.

Now, you can go ahead with the famous five-minute install like you would with any other WordPress site! If you didn’t set a custom domain name, your site should be accessible at the domain name outputted at cloudfront_distribution_domain_name. If you did set a custom domain, then set a CNAME or alias to the CloudFront distribution domain name, then you should be able to access the site there.

Where to go from here

Here are some ideas for performance improvements that I haven’t tried, but should have some potential.

  • Upload files to S3 instead of WordPress. I use this plugin by Human Made: humanmade/S3-Uploads.
  • Experiment with adjusting the opcache settings in src/php.ini.
  • Use a lightweight nginx server to serve static assets from EFS to CloudFront.
  • Experiment with setting Cache-Control headers in handler.php for static files.

Limitations

There are a couple hard limits imposed by AWS due to the technical limitations of the infrastructure.

Here are some other limitations that you’ll have to keep in mind.

  • No FTP / SSH access — you’ll need to manage an EC2 instance if you need command line or direct file access.
  • All the considerations of accessing a connection-oriented database from Lambda. You can try using Aurora Serverless if you run in to connection problems. RDS Proxy may also be able to provide you with a solution.

Thanks!

Thanks for reading! If you have any questions or comments, please don’t hesitate to leave a comment or send me a tweet.

Categories
AWS

Rails on AWS: Do you need nginx between Puma and ALB?

When I set up Rails on AWS, I usually use the following pattern:

(CloudFront) → ALB → Puma

I was wondering: Is it always necessary to put nginx between the ALB and Puma server?

My theory behind not using nginx is that because it has its own queue (while the Classic Load Balancer had a very limited “surge queue”, the ALB does not have such a queue), it will help in getting responses back to the user (trading for increased latency) while hindering metrics used for autoscaling and choosing what backend to route the request to (such as Rejected Connection Count).

I couldn’t find any in-depth articles about this, so I decided to prove my theory (in)correct by myself.

In this test, the application servers will be running using ECS on Fargate (platform version 1.4.0). It’s a very simple “hello world” app, but I’ll give it a bit of room to breathe with each instance having 1 vCPU and 2GB of RAM. I’ll be using Gatling on a single c5n.large instance (“up to 25 gigabits” should be enough for this test).

In this test, I wanted to try out a few configurations that mimic characteristics of applications I’ve worked on: short and long requests, usually IO-bound. A short request is defined as just rendering a simple HTML template. A long request is 300ms. The requests are ramped from 1 request/sec to 1000 requests/sec over 5 minutes.

Response Time Percentiles over Time (OK responses), simple render — 4 instances, 20 threads each, connected directly to the ALB.
Response Time Percentiles over Time (OK responses), simple render — 4 instances, 20 threads each, using Nginx.

As you can see, for the simple render scenario, Nginx and Puma were mostly the same. As load approached 1000 requests/sec, latency started to get worse, but all requests were completed with an OK status.

The 300ms scenario was a little more grim.

Number of responses per second (green OK, red error), 300ms response — 4 instances, 20 threads each, connected directly to the ALB.
Number of responses per second (green OK, red error), 300ms response — 4 instances, 20 threads each, using Nginx.

My theory that Puma will fail fast and give error status to the ALB when reaching capacity was right. The theoretical maximum throughput is 4 instances * 20 threads * (1000ms in 1 second / 300ms) = 266 requests/sec. Puma handles about 200 requests/sec before returning errors; Nginx starts returning error status at around 275 requests/sec, but at that point requests are already queueing and the response time is spiking.

Remember, these results are for this specific use case, and results for a test specific to your use case probably will be different, so it’s always important to do load testing tailored to your environment, especially for performance critical areas.

Categories
English Tools Useful Utilities

“Logging in” to AWS ECS Fargate

I’m a big fan of AWS ECS Fargate. I’ve written in the past about managing ECS clusters, and with Fargate — all of that work disappears and is managed by AWS instead. I like to refer to this as quasi-serverless. Sorta-serverless? Almost-serverless? I’m open to better suggestions. 😂

There are a few limitations of running in Fargate, and this blog post will focus on working around one limitation: there’s easy way to get an interactive command line shell within a running Fargate container.

The way I’m going to establish an interactive session inside Fargate is similar to how CircleCI or Heroku does this: start a SSH server in the container. This requires two components: the SSH server itself, which will be running in Fargate, and a tool to automate launching the SSH server. Most of this blog post will be about the tool to automate launching the server, called ecs-fargate-login.

If you want to skip to the code, I’ve made it available on GitHub using the MIT license, so feel free to use it as you wish.

How it works

This is what ecs-fargate-login does for you, in order:

  1. Generate a temporary SSH key pair.
  2. Use the ECS API to start a one-time task, setting the public key as an environment variable.
    • When the SSH server boots, it reads this environment variable and adds it to the list of authorized keys.
  3. Poll the ECS API for the IP address of the running task. ecs-fargate-login supports both public and private IPs.
  4. Start the ssh command and connect to the server.

When the SSH session finishes, ecs-fargate-login will make sure the ECS task is stopping.

Use cases

Most of my clients use Rails, and Rails provides an interactive REPL (read-eval-print loop) within the Rails environment. This REPL is useful for running one-off commands like creating new users or fixing some data in the database, checking and/or clearing cache items, to mention a few common tasks. Rails developers are accustomed to using the REPL, so while not entirely necessary (in the past, I usually recommended fixing data using direct database access or with one-time scripts in the application repository), it is a nice-to-have feature.

In conclusion

I don’t use this tool daily, but probably a few times a week. A few clients of mine use it as well, and they’re generally happy with how it works. However, if you have any recommendations about how it could be improved, or how the way the tool itself is architected could be improved, I’m always open to discussion. This was my first serious attempt at writing Golang code, so there are probably quite a few beginner mistakes in the code, but it should work as expected.

Categories
AWS English

Managing ECS clusters, 4 years in.

Throughout these past 4 years since AWS ECS became generally available, I’ve had the opportunity to manage 4 major ECS cluster deployments.

Across these deployments, I’ve built up knowledge and tools to help manage them, make them safer, more reliable, and cheaper to run. This article has a bunch of tips and tricks I’ve learned along the way.

Note that most of these tips are rendered useless if you use Fargate! I usually use Fargate these days, but there are still valid reasons for managing your own cluster.

Spot Instances

ECS clusters are great places to use spot instances, especially when managed by a Spot Fleet. As long as you handle the “spot instance is about to be terminated” event, and set the container instance to draining status, it works pretty well. When ECS is told to drain a container instance, it will stop the tasks cleanly on the instance and run them somewhere else. I’ve made the source code for this Lambda function available on GitHub.

Just make sure your app is able to stop itself and boot another instance in 2 minutes (the warning time you have before the spot instance is terminated). I’ve experienced overall savings of around 60% when using a cluster exclusively comprised of spot instances (EBS is not discounted).

Autoscaling Group Lifecycle Hooks

If you need to use on-demand instances for your ECS cluster, or you’re using a mixed spot/on-demand cluster, I recommend using an Autoscaling Group to manage your cluster instances.

To prevent the ASG from stopping instances with tasks currently running, you have to write your own integration. AWS provides some sample code, which I’ve modified and published on GitHub.

The basic gist of this integration is:

  1. When an instance is scheduled for termination, the Autoscaling Group sends a message to an SNS topic.
  2. Lambda is subscribed to this topic, and receives the message.
  3. Lambda tells the ECS API to drain the instance that is scheduled to be terminated.
  4. If the instance has zero running tasks, Lambda tells the Autoscaling Group to continue with termination. The Autoscaling Group terminates the instance at this point.
  5. If the instance has more than zero running tasks, Lambda waits for some time and sends the same message to the topic, returning to step (2).

By default, I set the timeout for this operation to 15 minutes. This value depends on the specific application. If your applications require more than 15 minutes to cleanly shut down and relocate to another container instance, you’ll have to set this value accordingly. (Also, you’ll have to change the default ECS StopTask SIGTERM timeout — look for the “ECS_CONTAINER_STOP_TIMEOUT” environment variable)

Cluster Instance Scaling

Cluster instance scale-out is pretty easy. Set some CloudWatch alarms on the ECS CPUReservation and MemoryReservation metrics, and you can scale out according to those. Scaling in is a little more tricky.

I originally used those same metrics to scale in. Now, I use a Lambda script that runs every 30 minutes, cleaning up unused resources until a certain threshold of available CPU and memory is reached. This technique further reduces service disruption. I’ll post this on GitHub sometime in the near future.

Application Deployment

I’ve gone through a few application deployment strategies.

  1. Hosted CI + Deploy Shell Script
    • Pros: simple.
    • Cons: you need somewhere to run it, easily becomes a mess. Shell scripts are a pain to debug and test.
  2. Hosted CI + Deploy Python Script (I might put this on GitHub sometime)
    • Pros: powerful, easier to test than using a bunch of shell scripts.
    • Cons: be careful about extending the script. It can quickly become spaghetti code.
  3. Jenkins
    • Pros: powerful.
    • Cons: Jenkins.
  4. CodeBuild + CodePipeline
    • Pros: simple; ECS deployment was recently added; can be managed with Terraform.
    • Cons: Subject to limitations of CodePipeline (pretty limited). In our use case, the sticking points are not being able to deploy an arbitrary Git branch (you have to deploy the branch specified in the CodePipeline definition).

Grab-bag

Other tips and tricks

  • Docker stdout logging is not cheap (also, performance is highly variable across log drivers — I recently had a major problem with the fluentd driver blocking all writes). If your application blocks on logging (looking at you, Ruby), performance will suffer.
  • Having a few large instances yields more performance than many small instances (with the added benefit of having the layer cache when performing deploys).
  • The default placing strategy should be: binpack on the resource that is most important to your application (CPU or memory), AZ-balanced
  • Applications that can’t be safely shut down in less than 1 minute do not work well with Spot instances. Use a placement constraint to make sure these tasks don’t get scheduled on a Spot instance (you’ll have to set the attribute yourself, probably using the EC2 user data)
  • Spot Fleet + ECS = ❤️
  • aws update-service help for service administration commands. I use --force-new-deployment and --desired-count quite often.
  • If you manage your own EC2 instances with Auto Scaling Groups: aws autoscaling terminate-instance-in-auto-scaling-group --instance-id "i-XXX" --no-should-decrement-desired-capacity will start a new EC2 instance and perform termination lifecycle hooks on it. This is what I use to switch out old EC2 instances with new launch configurations.