Categories
WordPress 日本語

このブログの多言語対応について

このブログは、WordPress のカテゴリーを使って言語を分けています。

私自身は英語ネイティブなのでデフォルトの言語は英語に設定しておりますが、日本語の投稿も書く機会もあります。僕が理想と思ったプラグインがなかなか無くて、簡単なのを作ろうと思いました。

大体の多言語対応プラグインは機能が多くて管理が結構大変なイメージだったけど、私のような「ほとんど英語で書くけど、たまには日本語で書きたい」ニーズに答えられるのがありませんでした。

日本語の投稿の執筆時に、「日本語」というカテゴリーを選択します(厳密にいうと、カテゴリーのスラッグが japanese であることを使っています)。そうすると、その記事の設定が日本語設定になって、フォントの設定やテーマの翻訳が自動的に日本語になります。

コードは GitHub 上に公開しましたが、日本語しか対応していないためプラグインディレクトリに提出しておりません。使いたい方はご自身でダウンロードしてカスタマイズした上で使ってください。もし不明点や興味があればコメントや Twitter で声かけてくれると嬉しいです。

Categories
AWS WordPress 日本語

WordPress を AWS Lambda で運用する

以前 WordPress を AWS Lambda で 運用する記事を投稿 (英語) しましたが、EFS対応前に執筆しました。EFS を使える様になって、WordPress を AWS Lambda 内の実行環境が完全に変わったので新しい記事を書きました。

今回は、SAM より Terraform を選びました。理由はいくつかありますが、主には私が管理するインフラはほぼ Terraform で管理されているのため、既存環境と融合性が優れてる。

Terraform モジュールとして公開しています。ソースコードは GitHub で公開しています。

実際どうなの?

まあまあいいよ。このリンク先で稼働しています。めちゃくちゃ速いわけでもないけど、遅すぎというわけでもない。CloudFrontを利用して静的アセットをキャッシュし、 opcache をチューニングしたらだいぶ速くなった。

通常なら Lambda が同時並行で起動されるときは個々のインスタンスが独立されて実行されれますが、 EFS を使えば異なる Lambda のインスタンスを跨いでファイルシステムを同期させることができる。このため、通常通り WordPress の更新、テーマやプラグインインストール、アップロード等利用できる。

準備するもの

今回のチュートリアルでは、 Lambda のソースコードに入ってるのは PHP を実行する環境のみ。 WordPress のファイル等は、 EFS のボリュームにインストールするので、別途 EC2 のインスタンスを用意する必要があります。

下記に、具体的に何を用意しないといけないのをリストしました。

  1. 有効なAWSアカウント
  2. インターネットにアクセスできるプライベートサブネット。 EFS を使うために VPC 内に Lambda を起動する制約がありますが、そうすると NATゲートウェイNATインスタンス (比較) を使わないとインターネットにアクセスできない。
  3. Terraform 0.12 以上
  4. MySQL データベース
  5. WordPress のファイルを初期インストールするための EC2 インスタンス

Terraform が作成するリソース一覧はこちらにあります

ステップ

今回は独立した Terraform モジュールを使いますが、他の Terraform の環境に埋め込む場合は適宜修正してください。

このチュートリアルをそのまま使う場合、us-west-2 リージョンを使ってください。PHP は標準で提供されていないため、カスタムの Lambda レイヤーを使って実行します。私が公開したレイヤーが現在、 us-west-2 しか公開していない。他のリージョンでも公開することを努めていますが、その間は私がフォークした php-lambda-layer を直接作成することができます。

1. EC2インスタンスを起動する

今回、 t3a.nano を選びました。amazon-efs-utils のパッケージを予めインストールしておくのはおすすめです。

コンソールにいるついでに、データベースにアクセスできるセキュリティグループのIDと Lambda を起動するプライベートサブネットのIDをメモしておいてください。

2. Terraform 環境を作成する
$ git clone https://github.com/KotobaMedia/terraform-aws-wordpress-on-lambda-efs
$ cd ./terraform-aws-wordpress-on-lambda-efs

ディレクトリに local.auto.tfvarsというファイルを作って、下記の情報を入れます。

# ステップ1でメモしたセキュリティグループのIDを配列に入れます
security_group_ids = ["sg-XXX"]

# ステップ1でメモしたサブネットのIDを配列に入れます
subnet_ids = ["subnet-XXX", "subnet-XXX", "subnet-XXX"]

もし ~~.cloudfront.net のデフォルトドメインより、カスタムドメインを使う場合は、 acm_certificate_namedomain_name 変数も指定します。

Apply すると、terraform がリソースを作ってくれます。

$ terraform apply

AWS 認証情報を求められる場合、中止 (Ctrl-C) した上、環境変数で認証情報を設定してください。私の場合、複数のAWS環境を管理しているので、AWS_PROFILE という環境変数をよく使います。

Terraform が実際にインフラのリソースを作成する前に、実際稼働しているインフラのリソースの差分を出します。今回は新しく作成しているはずなので、全て「追加」というように出ると思います。確認した上で、 yes を答えてください。

CloudFront distribution が入ってるため、apply に多少時間かかる(僕の場合は、全部で5分ぐらいかかりました)。完了したら、アウトプット変数がいくつか表示されます。この変数をまただす場合は、 terraform output コマンドを使ってください。

そのターミナルをそのまま開いてください、後で使います。

3. EC2 に EFS のファイルシステムをマウントする

EC2 が EFS にアクセスするためにセキュリティグループをアサインする必要があります。ステップ2の Terraform が EFS にアクセスできるためのセキュリティグループを作ってくれたので、それを使いました。 efs_security_group_id のアウトプット変数の値を EC2 インスタンスに貼り付けてください

次、EC2 にログインして、 EFS をマウントしましょう。下記のコマンドから、fs-XXXXXefs_file_system_id のアウトプット変数の値で置き換えてください。

$ sudo -s
# mkdir /mnt/efs
# mount -t efs fs-XXXXX:/ /mnt/efs

もし問題などあれば、ユーザーガイドによくある問題をリストしているので、確認してください。

4. WordPress をインストールしましょう

ファイルシステムがマウントされて、やっと WordPress のファイルをインストールできるようになりました。 Terraform がランダムで新しいディレクトリを作った( /mnt/efs/roots/wp-lambda-$ランダム )ので、そこに cd しましょう。

最新の WordPress をダウンロードして、そこに解凍してください。

ここから、通常通りの WordPress のインストールを進められることができると思います。カスタムドメインを利用していない場合は cloudfront_distribution_domain_name でアクセスできます。カスタムドメインを利用している場合は、CloudFront のdistribution のドメインに CNAME を向けて、指定したドメインでアクセスできると思います。

ここから何ができるか

このままだとパーフォーマンスが最高とは言えないのですが、下記の最適化も加えられると考えられます。

  • アップロードファイルを EFS より S3 にアップロードする。私は Humanmade の S3 Uploads プラグインをよく使います。
  • src/php.ini に入ってる opcache の設定を調節する。
  • 静的アセット( JS / CSS 等)を軽量な nginx サーバーで返す。
  • handler.php を調節して Cache-Control を追加する。これによって、 CloudFront のキャッシュがもっと使えるようになります。

制約

AWS のサービスの技術的な制約によって下記のようなリミットがあります。

この運用の形によって、他の制約もあります。

  • FTP やログイン可能な SSH アクセスがありません。EC2 インスタンスを使ってファイルを管理しないといけない。
  • 無限に同時並行で実行できるプラットフォーム Lambda から接続数が有限な MySQL に接続します。もし接続で問題になるところがあれば Aurora Serverless を試してみる価値があると思います。

最後まで読んでくれてありがとうございます!

質問、難しかったところ、改善してほしいところ、コメント等は下記のコメントフォームや Twitter で連絡してください。

Categories
AWS English WordPress

WordPress on AWS Lambda (EFS Edition)

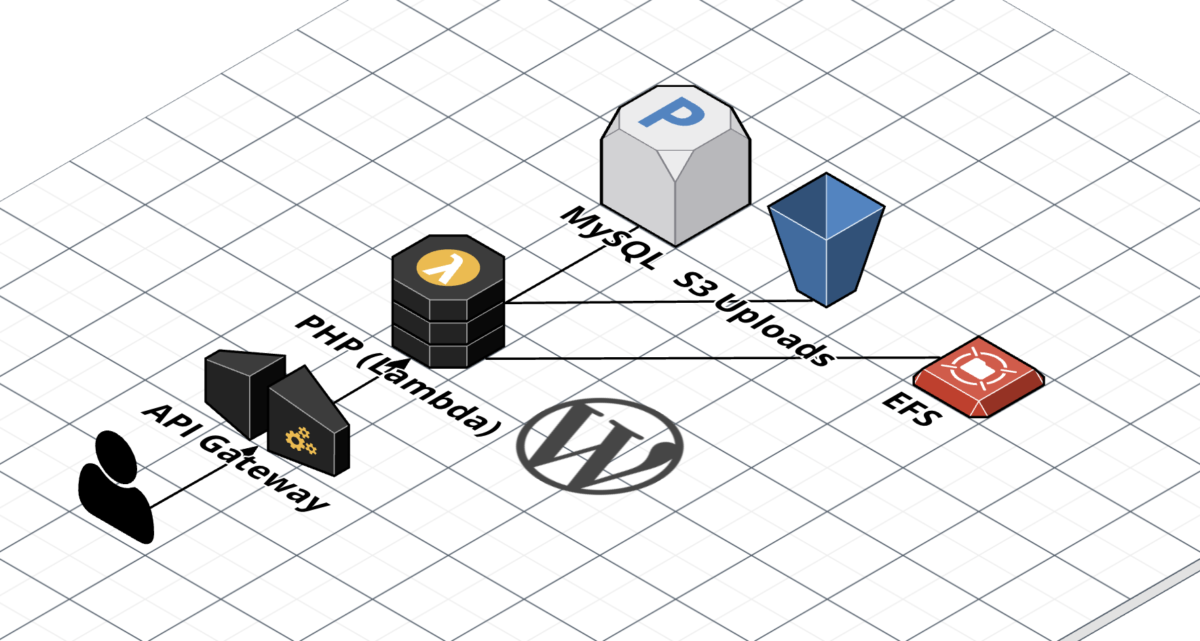
I previously wrote a post about running WordPress on AWS Lambda, but it was before EFS support was announced (EFS is a managed network file system AWS provides). Being able to use EFS completely changes the way WordPress works in Lambda (for the better!), so I felt it warranted a new blog post.

In addition, this time I’m using Terraform instead of SAM. This matches the existing infrastructure-as-code setup I use when I deploy infrastructure for clients. Here’s the Terraform module (source code).

Summary

It works. It’s OK. Check it out, it’s running here. It’s not the best, but it isn’t bad, either. The biggest performance bottleneck is the EFS filesystem, and there’s no getting around that. PHP is serving static assets bundled with WordPress as well, which adds to some latency (in this configuration, CloudFront is caching most of these files, however). Tuning opcache to cache files in memory longer helped a lot.

Because EFS is synchronized across all the instances of Lambda, online updates, installs, and uploads work as expected.

What You’ll Need

In this setup, Lambda is only used for running PHP — installing the initial WordPress files is done on an EC2 instance that has the EFS volume mounted. This is a list of what you’ll need.

  1. An AWS account.
  2. A VPC with Internet access through a NAT gateway or instance (comparison). This is important because EFS connectivity requires Lambda to be set up in a VPC, but it won’t have Internet access by default.
  3. Terraform (the module uses v0.12 syntax, so you’ll need to use v0.12.)
  4. A MySQL database (I’m using MySQL on RDS using the smallest instance available)
  5. An EC2 instance to perform the initial setup and install of WordPress.

For a list of the resources that Terraform will provision, take a look at the Resources page here.

Steps

These steps assume you’re running this Terraform module standalone — if you want to run it in the context of an existing Terraform setup, prepare to adjust accordingly.

If you’re following this step-by-step, be sure to choose the us-west-2 region. Lambda Layer that I’m using for this is only published in the us-west-2 region. I’m working on getting the layer published in other regions, but in the meantime, use my fork of the php-lambda-layer to create your own in the region of your choosing.

1. Start the EC2 instance.

(If it isn’t already running)

I’m using a t3a.nano instance. Install the amazon-efs-utils package to get ready for mounting the EFS volume.

Also, while you’re in the console, note down the ID of a Security Group that allows access to RDS and the IDs of the private subnets to launch Lambda in.

2. Get Terraform up and running.
$ git clone https://github.com/KotobaMedia/terraform-aws-wordpress-on-lambda-efs
$ cd ./terraform-aws-wordpress-on-lambda-efs

Create a file called local.auto.tfvars, and put the following contents in to it:

# An array of the Security Group IDs you listed in step 1.
security_group_ids = ["sg-XXX"]

# An array of the Subnet IDs you listed in step 1.
subnet_ids = ["subnet-XXX", "subnet-XXX", "subnet-XXX"]

If you want to use a custom domain name (instead of the default randomly-generated CloudFront domain name), set the acm_certificate_arn and domain_name variables as well.

Now, you’re ready to create the resources.

$ terraform apply

If you’re asked for your AWS credentials, Ctrl-C and try setting the authentication information via environment variables. I manage a lot of AWS accounts, so I use the AWS_PROFILE environment variable.

Terraform will ask you if you want to go ahead with the apply or not — look over the changes (the initial apply should not have any modifications or deletions), then respond yes.

When the apply has finished, you should see some outputs. If you don’t (or you already closed the window), you can always run terraform output. Keep this window open, you’ll need it in the next step.

3. Mount EFS on the EC2 instance.

First, we need to give the EC2 instance access to the EFS filesystem. Terraform created a security group for us (it’s in the efs_security_group_id output), so attach that to your EC2 instance.

Log in to your EC2 server, then mount the EFS filesystem (replace fs-XXXXX with the value of the efs_file_system_id output):

$ sudo -s
# mkdir /mnt/efs
# mount -t efs fs-XXXXX:/ /mnt/efs

If you’re having trouble mounting the filesystem, double check the security groups and take a look at the User Guide.

4. Install WordPress.

Now that the filesystem is mounted, we can finally proceed to install WordPress. Terraform automatically created a directory in the EFS filesystem (/mnt/efs/roots/wp-lambda-$RANDOM_STRING), so cd to there first. Download the latest version of WordPress, then extract the files there.

Now, you can go ahead with the famous five-minute install like you would with any other WordPress site! If you didn’t set a custom domain name, your site should be accessible at the domain name outputted at cloudfront_distribution_domain_name. If you did set a custom domain, then set a CNAME or alias to the CloudFront distribution domain name, then you should be able to access the site there.

Where to go from here

Here are some ideas for performance improvements that I haven’t tried, but should have some potential.

  • Upload files to S3 instead of WordPress. I use this plugin by Human Made: humanmade/S3-Uploads.
  • Experiment with adjusting the opcache settings in src/php.ini.
  • Use a lightweight nginx server to serve static assets from EFS to CloudFront.
  • Experiment with setting Cache-Control headers in handler.php for static files.

Limitations

There are a couple hard limits imposed by AWS due to the technical limitations of the infrastructure.

Here are some other limitations that you’ll have to keep in mind.

  • No FTP / SSH access — you’ll need to manage an EC2 instance if you need command line or direct file access.
  • All the considerations of accessing a connection-oriented database from Lambda. You can try using Aurora Serverless if you run in to connection problems. RDS Proxy may also be able to provide you with a solution.

Thanks!

Thanks for reading! If you have any questions or comments, please don’t hesitate to leave a comment or send me a tweet.
Categories
AWS English WordPress

Serverless WordPress on AWS Lambda

Update 2020/07/29: AWS recently announced EFS support for Lambda, which makes running WordPress in Lambda easier, with fewer limitations. Here’s the new article about how to run WordPress in Lambda using EFS.

There are a few ways to run WordPress “serverless” on AWS. I’m going to talk about running WordPress on Lambda for this article. If you’re interested in how you can run WordPress serverless-ly on Fargate, I’m working on a post about that too.

Keep in mind that while it is possible to do this, it’s not for everyone. It’s probably not for me. Probably not for you. Use at your own risk!

Before we start, there is a core feature of Lambda that make running WordPress in Lambda quite troublesome: Read-only file system. WordPress expects a writable, persistent, local file system. We’ll be using the S3 Uploads plugin by Human Made to handle media uploads. However, core and plugin updates will not work. There’s no workaround for this, so to install / update files, we’ll need to make a new Lambda deployment.

So: let’s go! First, you’ll want to clone my boilerplate repository. I’ve prepared a WordPress installation and a simple glue script to actually boot WordPress.

$ git clone https://github.com/keichan34/wordpress-on-lambda

My plan of attack is: run WordPress in the Lambda function using a PHP custom runtime, make uploads work with S3 instead of the local filesystem, and wire up the database. In the repository above, I’ve configured static assets to be served from S3 as well.

Now, let’s prepare the database. Lambda has two networking modes: public and VPC mode. In public mode, the Lambda has default access to the public internet, but nothing else. In VPC mode, the Lambda is booted inside the VPC, and doesn’t have public internet access by default. Because WordPress requires public internet access we have to either run it in public mode, or run it in VPC mode and prepare a NAT gateway (about $30 to $50 a month, depending on the region). If Lambda runs in public mode, the database must also be publicly accessible — something that is frowned upon from a security standpoint. You should choose the option that fits your risk and price profile. In my case, I’m going with the NAT gateway route.

Now we’ve got the messy stuff out of the way, we’ll have to assemble the Lambda runtime. AWS has an article on their blog detailing how to make a PHP custom runtime, but Stackery provides a batteries-included PHP layer. It includes everything you need to make a PHP application that assumes it’s running in a traditional server environment run in AWS Lambda.

# Replace "km-wordpress-on-lambda-deployment-201906" with something that makes sense for you. It's globally unique, so copying and pasting this will result in an error.
# Make sure you're in the same region as your database!

$ DEPLOY_BUCKET="km-wordpress-on-lambda-deployment-201906"
$ aws s3 mb "s3://$DEPLOY_BUCKET"
$ cd <the directory you cloned the GitHub repository to>

Now, it’s time to install WordPress! We’ll add the WordPress files to the deployment package. As usual, copy wp-config-example.php to wp-config.php. Enter your database details. If you have a hostname that you’re going to use with CloudFront, enter it now. If not, you’ll have to wait until after the CloudFront distribution is created, then try again.

Now, let’s deploy. This will create a new CloudFront distribution and S3 bucket for public assets, so maybe it’s a good time to make a cup of coffee. If you haven’t installed the SAM CLI, do that before the next block.

$ sam package --template-file template.yaml --output-template-file serverless-output.yaml --s3-bucket "$DEPLOY_BUCKET"
$ sam deploy --template-file serverless-output.yaml --stack-name wordpress-on-lambda --capabilities CAPABILITY_IAM
$ aws s3 sync ./src/php s3://deploy-bucket-XXXXX --exclude "*.php" --exclude "*.ini"

I’ll be using the default CloudFront domain for this demo. If you’re going to be using your own domain, you need to modify the template.yaml file to add the an alias to the CloudFront distribution. Use the following command to show the CloudFront domain name.

$ aws cloudformation describe-stacks --stack-name wordpress-on-lambda | jq '.Stacks[0].Outputs'

OK! Now, you should be able to access the CloudFront URL, and you’ll get redirected to the friendly WordPress installer! If you’ve set up your wp-config.php correctly, the installation should go smoothly.

The site I set up for this post is available here: https://dskhgdbzphjkm.cloudfront.net/

Lessons Learned

This is for almost no-one. I think the only valid use case (in this current form) for running WordPress in AWS Lambda is a site that gets periodic, unpredictable spikes of intense traffic — a use case where Lambda’s scalability and price model pays off. This is also a use case where, presumably, the benefits of the scalability trumps the inconvenience of not being able to use the online updaters and installers (also, I’m assuming the database will be able to keep up with the load).

However, if updating and installing themes or plugins could be managed outside of the Lambda environment (say, with wp-cli), with deployments automated… Then, it may be a little more applicable to a larger audience.

If you’re looking for a cheap solution to host your personal blog (like me!), you might just want to bite the bullet and check out any of the hosted WordPress solutions out there.

If you liked this post, or you’d like to provide some input, please do so in the comments. My favorite AWS service is Lambda, and I like pushing it a bit, so look forward to similar posts in the future. If you find bugs in the boilerplate, or you can make improvements, please open an issue or PR!

Miscellaneous Tidbits

  • Aurora Serverless sounds like it would be the best match for this setup. It probably is. Just keep in mind that Aurora Serverless doesn’t support publicly accessible clusters. To use it, you’ll need to go the Lambda-in-VPC, NAT gateway route.
  • Regarding public / private access and NAT gateways, if you’re like me and believe in the future of IPv6 and think that you can just use an egress-only internet gateway – you’re wrong! Lambda doesn’t seem to support IPv6 at this time.
  • You can actually use a NAT instance if the NAT gateway is overkill. However, I would recommend using the NAT gateway if you can. It comes with automatic scalability and redundancy, so you don’t have to babysit your NAT instance. (If you need more than one NAT instance, use the gateway. Seriously.)
  • At time of writing, my patches to php-lambda-layer haven’t been merged yet, so you can use my patched version (the boilerplate repository has this applied already).
  • If you’re really going all-in, consider using an Application Load Balancer rather than API Gateway to save money. API Gateway has zero fixed costs, but there is a point where ALB will become cheaper than API Gateway.
  • Doing some crude calculations, you should be able to handle an average of a few hundred users per day under the perpetual free tier. Your highest bill may be data transfer to the user.
Categories
App.net English WordPress

App.Net Comments Widget on WordPress

I noticed that most of the good discussion I was having about blog posts were on App.net. Turns out, many other people feel the same way, and there’s even an official App.net comments widget!

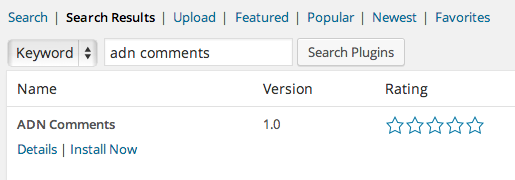
I’ve been testing a WordPress plugin to replace the default WordPress comments with ADN comments on this site for quite a while, so I decided to publish it in the WordPress Plugin Directory. Just search for “ADN Comments”, and it should be the first result.

ADN Comments

Installing this plugin will completely replace WordPress comments. You won’t even be able to see them from the admin dashboard — the data is still there, but just hidden. If you don’t like ADN Comments, just disable the plugin and all your old comments will reappear.

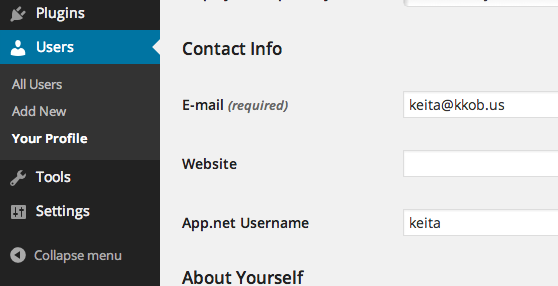
If you’d like to display your username as the default “reply-to” username, please set your App.net username in the “Contact Info” section of your profile.

WordPress Admin => Users => Your Profile => Contact Info => App.net Username

Source code is available under the GPLv2 (or later) license. Code contributions, bug reports, etc, are welcome at the GitHub repository.

Categories
English Nginx Optimization & Speed PHP WordPress

WordPress Meetup Tokyo — WordPress Server Optimization

I recently gave a quick talk about how I use Nginx, HHVM, MariaDB with WordPress on this blog at the March WordPress Meetup in Tokyo. Here are the slides:

I’ve published a Vagrant template for the setup detailed in the slides.

Categories
English Nginx Optimization & Speed WordPress

SSL and SPDY

In my quest for faster response times and page load speed, I’ve been playing around with Google’s SPDY. I finally got around to getting a SSL certificate for this website and installing the latest version of the SPDY module for Nginx.

WordPress, alone, doesn’t really support SSL on all pages out of the box — here are some extra things you probably want to implement.

  1. Redirect all non-HTTPS traffic to the HTTPS server. For example, this is what I use:
    server {
      listen 80;
      server_name keita.blog;
      return 301 https://keita.blog$request_uri;
    }
    
  2. Use HTTP Strict Transport Security:
    server {
      listen 443 ssl spdy;
      ...
      add_header Strict-Transport-Security "max-age=31536000";
      ...
    }
    

    Using HSTS has the benefit of letting the user agent know that all requests should be using the HTTPS protocol for this domain. This is important because some WordPress plugins and/or themes will prefer to use HTTP, even though the connection is HTTPS. I had a problem with some AJAX functions and Jetpack’s Infinite Scroll.

  3. (Optional) Install a HTTPS plugin. Not required, but it might help some problems with non-HTTPS content domains, et cetera.

Categories
English Nginx Tools WordPress

WordPress on Nginx, HHVM, and MariaDB

Update 2014/4/24: I’ve updated the template to work with the latest HHVM 3.0+, and also squished some bugs.

I’ve been talking quite a bit about WordPress on HHVM recently, and it’s gotten a bit of attention, so I decided to open-source my Vagrant setup for running WordPress on HHVM.

I originally made this Vagrant setup to test HHVM on my local machine before deploying updates to the theme, plugins, etc.

Have fun, and please ping me if you have any problems!

GitHub link

Details

Categories
English PHP WordPress

HHVM and WordPress

Update 2014/4/17: This site now runs WordPress 3.9, which seems to be working fine with HHVM. Also, compatibility has improved, thanks to a patch in the WordPress core specifically for HHVM.

I recently posted about how I switched out PHP-FPM (PHP’s FastCGI pool) for HHVM. Today I’ll be talking more about the install process on the server, and using it to set up WordPress.

What is HHVM?

This is usually what happens in a (successful) startup[footnote]Twitter is (in)famous for its use of Ruby on Rails, which eventually had to be re-written in Scala, a language that runs on the JVM.[/footnote]:

  1. Initial codebase is written in an interpreted language, trading agility and developer productivity for slower response speeds and increased CPU usage on the servers.
  2. The service sees new users coming in and the initial codebase becomes strained.
  3. The service scales up the number of servers, but hits a wall.
  4. The codebase is re-written, either wholly or partially, in to a more performant and efficient language.

Facebook did steps 1 to 3, but refused to do step 4. Compiled languages, while having strengths in performance and efficiency, are usually harder to program in than interpreted languages. So, Facebook made something called HipHop for PHP. HipHop for PHP, or HPHPc for short, compiles PHP into C++, then compiles that into a big binary file. This allows PHP developers to do what they do best — develop in PHP, without worrying (too much) about performance.

As Facebook grew even more, HPHPc began to show its limitations[footnote]Compile time, compiled binary size, lack of MARKDOWN_HASH0f953f8e8cc058300e5041e6f079ab63MARKDOWN_HASH and MARKDOWN_HASH346e614b0b5901e8cdf0ca89b1b3950cMARKDOWN_HASH support, to name a few.[/footnote].

Out of this, came HHVM. HHVM is short for HipHop Virtual Machine, and uses a Just-in-Time (JIT) compiler to run PHP code. The main benefit developers do not need compile the whole binary every time they want deploy new code. With HHVM, Facebook has also worked towards full PHP 5.5[footnote]Wow HHVM is fast…too bad it doesn’t run my code[/footnote] support, support of create_function() and eval(), enabling the majority of PHP application frameworks to work with HHVM.

This includes…

WordPress

WordPress is written in PHP, and runs very well on HHVM. Previously, getting WordPress to work on HHVM required some patches to the core code[footnote]Getting WordPress running on HHVM « HipHop Virtual Machine[/footnote], but these issues have been resolved.

I’ve been running this blog on HHVM for about a week now, and response time is consistently 10x faster than before — 100x if using something like Batcache.

Installation

This server is running CentOS 6.3. While there are packages with HHVM pre-compiled, these packages are not officially supported by Facebook, and are usually compiled by individuals. Your mileage may vary, but package conflicts prevented me from installing any pre-compiled HHVM packages — so I had to compile it myself.

If you plan on running a server with HHVM from scratch, I highly recommend using Ubuntu, and the official precompiled packages for Ubuntu 13.10 / 12.04.

Bugs / Things to watch out for

Because HHVM is not PHP, you may occasionally run into unexpected behavior. Here are some problems I had while setting this site up:

  • No MySQLi support — this means tools like phpMyAdmin and database backup plugins that rely on MySQLi won’t work. Edit: HHVM 3.0 and above have MySQLi built in.
  • In the WordPress “General Settings” area, setting “Timezone” to something like “Asia/Tokyo” caused WordPress to crash. The “UTC +/- (hour)” settings seem to work fine.

That’s all, for now. When I run into more problems, I’ll make sure I post about them (with a workaround, if available).

Categories
English WordPress

wp_enqueue your scripts and styles.

The ease of making a WordPress theme is both a blessing and a curse. It allows people to get started with programming relatively easy — most hosting providers have PHP / MySQL, and the majority have a WordPress quick-install. However, this easiness comes with a dangerous pitfall — it’s easy to do the wrong thing. The classic example of this is query_posts (hint: never use it).

Today, I’ll talk about wp_enqueue_script and wp_enqueue_style. If you have ever made a plugin that requires additional stylesheets or scripts in the front-end, you know exactly what this is (and why it’s important).

The easy way out in this situation is to manually write scripts and styles in header.php like this:

...
<script src="<?php echo get_template_directory_uri(); ?>/hello.js"></script>
...
<?php wp_head(); ?>
...

Although this will work, you may start to notice funny things happening when you want to use jQuery.

...
<script src="<?php echo get_template_directory_uri(); ?>/hello.js"></script>
<script src="<?php echo get_template_directory_uri(); ?>/my_jquery.js"></script>
...
<?php wp_head(); ?>
...

The problem here is that WordPress actually uses jQuery internally for the admin bar. And, it doesn’t know that you’ve packaged your own version of jQuery — so it actually loads twice, when the admin bar is showing. This can cause problems that are time-consuming to fix, and just a waste of time.

WordPress has a mechanism to deal with this, wp_enqueue_script and wp_enqueue_style. These functions will determine the order of scripts and styles based on dependencies, and will only output the styles / scripts that are needed. This kills a few birds with one stone: loading everything in the correct order, making sure nothing is loaded twice, and not wasting bytes on scripts or styles that won’t be used by the current page.

Enough talk! Let’s get into the code.

First, you’ll need a functions.php, with the following code.

/**
 * Enqueue theme scripts and styles
 */
add_action( 'wp_enqueue_scripts', 'THEME_NAME_register_scripts' );
function THEME_NAME_register_scripts () {
  // wp_register_script( script identifier, absolute URI, array of dependencies, version )
  wp_register_script('home', get_template_directory_uri() . '/js/home.js', array('jquery'), filemtime(dirname(__FILE__) . '/js/home.js'));

  if (is_home()) {
    wp_enqueue_script('home');
  }
}

In this example, there is a JavaScript file called “home.js” in the “js” directory. This file requires jQuery, so it will be loaded after jQuery has finished loading. At the bottom of the function, the is_home() conditional is used to load the script only when the home page is showing.

Instead of using conditional tags in the wp_enqueue_scripts action, you can also register your scripts in the enqueue action, then enqueue them in the actual template file. Add the following to the template file, before get_header();:

add_action('wp_enqueue_scripts', function() { wp_enqueue_script('home'); }, 15);

This will load the ‘home’ script that we set up in the earlier snippet.

Have fun! I would be interested to hear feedback — any cool uses of wp_enqueue, et cetera.

Documentation

The syntax of wp_enqueue_style and wp_register_style is similar to the script counterparts, and they go in the same wp_enqueue_scripts action.

Documentation for wp_enqueue_style

Documentation for wp_register_script, including the scripts that WordPress has pre-packaged for you!

Documentation for wp_enqueue_script